图片轮播
前言
用两种方式实现图片轮播,自动轮播和拖动轮播。
代码结构
由于 img 是一个可选标签,可以被拖动,我们这里选择用 background-image 来实现。基本的 DOM 结构和 CSS 如下:
<style>
    .carousel {
        width: 500px;
        height: 280px;
        margin: 30px auto;
        font-size: 0;
        white-space: nowrap;
        overflow: hidden;
    }
    .carousel > div {
        display: inline-block;
        width: 500px;
        height: 280px;
        background-size: contain;
        transition: ease 0.5s;
    }
    .carousel > div:nth-child(1) {
        background-image: url('https://img.clloz.com/blog/writing/cat1.jpg');
    }
    .carousel > div:nth-child(2) {
        background-image: url('https://img.clloz.com/blog/writing/cat2.jpg');
    }
    .carousel > div:nth-child(3) {
        background-image: url('https://img.clloz.com/blog/writing/cat3.jpg');
    }
    .carousel > div:nth-child(4) {
        background-image: url('https://img.clloz.com/blog/writing/cat4.jpg');
    }
</style>

<div class="carousel cp1">
    <div></div>
    <div></div>
    <div></div>
    <div></div>
</div>
<div class="carousel cp2">
    <div></div>
    <div></div>
    <div></div>
    <div></div>
</div>
我们用 display: inline-block 和 overflow: hidden 让图片横向排列并且一次只显示一张。这里需要注意 inline-block 空格导致的间隙问题,我直接用 font-size: 0 来解决。
自动轮播
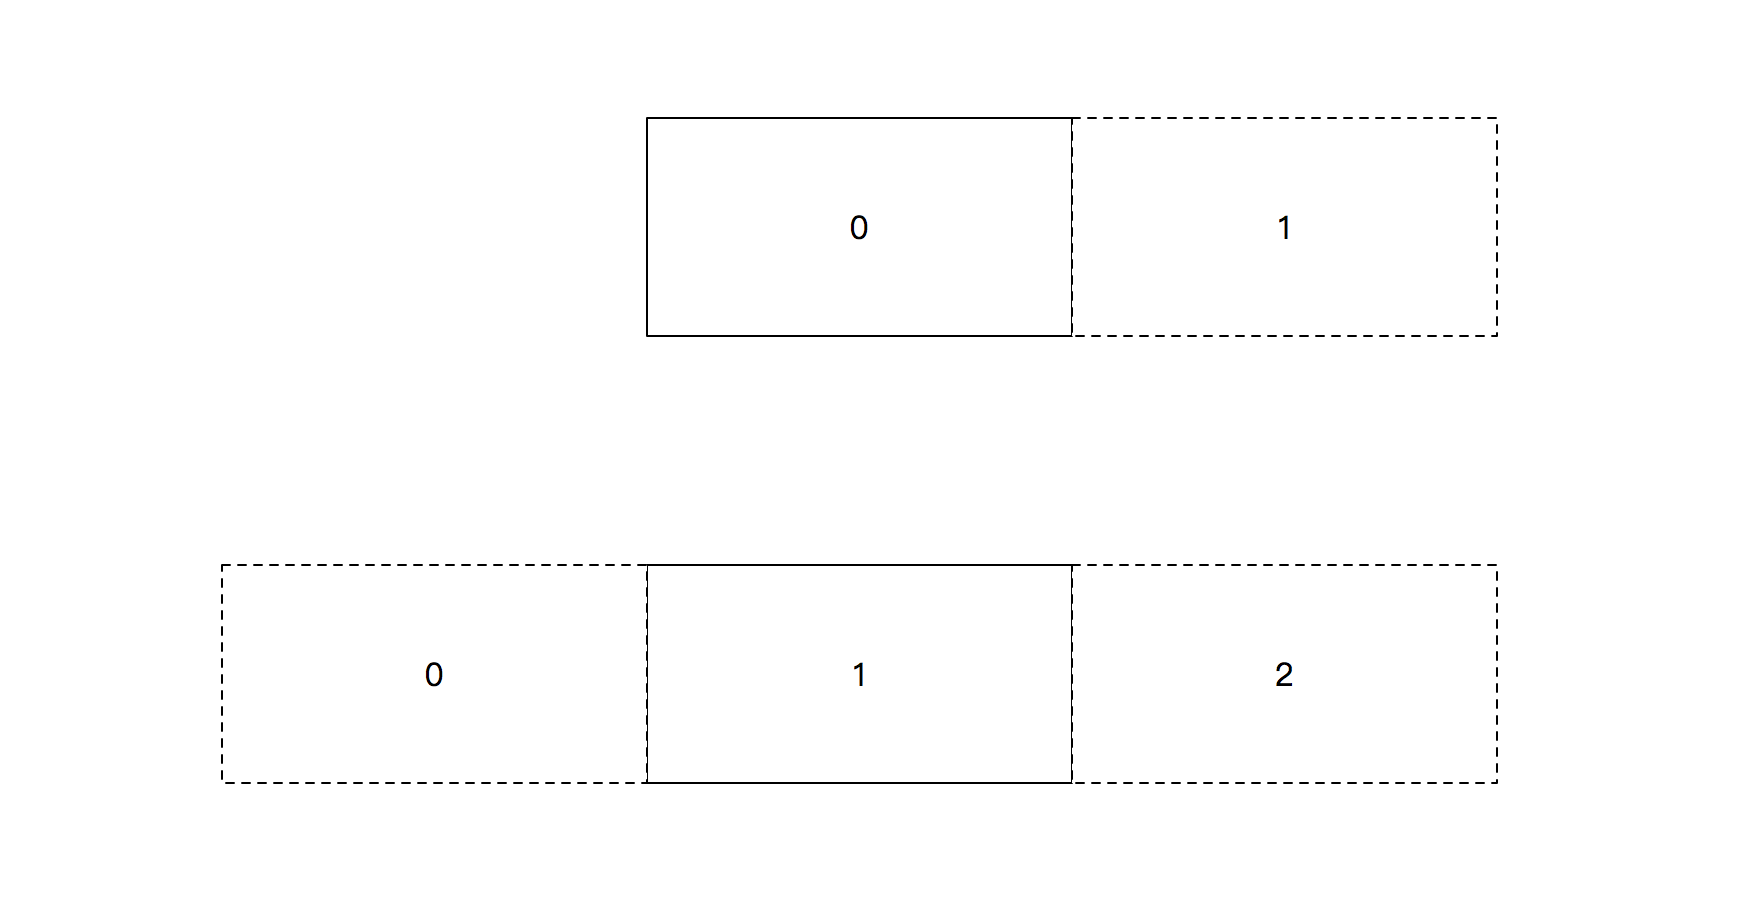
自动轮播的逻辑是比较简单的,我们其实只要关注两张图片,即当前图片和下一张图片。设每一张图片的编号为 index (从 0 开始),每一张图片要显示所对应的 translateX 的值就是 -(index * 100)%。所以我们只需要每次移动时将当前图片和下一章图片左移一个单位(即一张图片的宽度),同时将下一次要显示的图片放到当前图片的右边一个单位。如下图:

关键逻辑就是将下次要显示的图片移动到预备位置,并且这个过程要关掉动画效果。最后的代码如下:
// transform loop settimeout
let el2 = document.querySelector('.carousel.cp2');
let currentIndex = 0;
setInterval(() => {
    let children = el2.children;
    let nextIndex = (currentIndex + 1) % children.length;
    let current = children[currentIndex];
    let next = children[nextIndex];

    next.style.transition = 'none';
    next.style.transform = `translateX(${100 - nextIndex * 100}%)`;

    setTimeout(() => {
        next.style.transition = '';
        current.style.transform = `translateX(${-100 - currentIndex * 100}%)`;
        next.style.transform = `translateX(${-nextIndex * 100}%)`;
        currentIndex = nextIndex;
    }, 16);
}, 3000);
动画效果的开关我们可以用 element.style.transition 来控制行内样式的值来达到效果。因为行内样式的优先级最高,当我们设置其值为 none 会覆盖 style 标签中的样式。当我们将 element.style.transition 的值设为 '',style 标签中的对应样式又生效了
代码中间使用了一个小技巧。就是如果连续对同一个元素进行操作,浏览器会忽略前一个操作,这里我们用一个 setTimeout 避免浏览器的这种行为,16ms 为浏览器一帧的时间。
还有一点就是最后一张图片的下一张应该是第一张,这里我们可以使用简单的模运算来达到效果,模就是元素的个数。
拖动轮播
拖动轮播的逻辑要比自动复杂一些,因为拖动的情况下我们既可以向左又可以向右进行拖动。并且当拖动结束的时候,显示窗口中会有两张图片,我们要根据面积来判断哪张图片显示,并且要把另一张图片也移动到窗口外。
首先我们要处理拖动事件,这个逻辑和我在拖动旋转 3D 的骰子效果一文中的逻辑是相同,我们对包含元素,也就是代码中的 .carousel 绑定一个 mousedown 事件,在其回调函数中绑定 mousemove 和 mouseup 事件。注意后两个事件要绑定到 document 上,因为我们即使拖动到元素外也是一个完整的 mousemove 行为,并且绑定到 document 上即使我们拖出浏览器外也依然能保持触发 mousemove 事件。
mousedown 事件我们只要做一件事就是记录用户点击的初始位置坐标,用 clientX(因为轮播是横向的,我们只需要判断 x 方向的移动距离)
mousemove 我们要处理图片的移动,这里我们需要将动画效果关闭。以一张图片的的宽度为一个单位,我们只需要知道一共滚过了几个单位,就知道当前显示图片的 index,然后在计算当前 index 的前一张和后一张就能够得到连续的效果。mousemove 回调函数如下:
let move = e => {
    let x = e.clientX - startX;

    //拖动的整数屏
    let current = index - (x - (x % 500)) / 500;

    for (let offset of [-1, 0, 1]) {
        //计算可能出现的图片下标
        let pos = current + offset;
        pos = (pos + children.length) % children.length; //要处理大屏幕拖动小于 -children.length 的情况

        children[pos].style.transition = 'none';
        children[pos].style.transform = `translateX(${-pos * 500 + offset * 500 + (x % 500)}px)`; //当前,前一个,后一个图片当前位置
    }
};
mouseup 是这里面逻辑稍微复杂的一个,当我们拖动停止的时候,视口里面会有两张图片(一般情况下)(x 为 e.clientX - startX,即从触发 mousedown 到 mouseup 水平方向一共移动了多少像素),我们要判断哪张图片所占面积比较大,让这张图片用动画移动到整个视口,而另一张图片用动画移出视口。这里我讲两种实现方式。
第一种是比较好理解,但是代码量比较大。我们可以用 (x - (x % 500)) / 500 得出一共滚动了多少个单位,index - (x - (x % 500)) / 500 这张图片在触发 mouseup 时必然在视口内,只是我们不确定它是要移出的还是要显示的,我们只需要分情况,用 if 判断一下 x % 500 的各种情况。
x % 500 的值就是页面滚动完整数个单位后多的部分,这部分如果超过一半的图片宽度,当前图片就要从视口移出;如果小于一半的图片宽度,当前图片就显示到视口中。同时我们还要判断视口中的另一张图片的移动方向,这里就不仅需要判断面积,同时需要判断是向左拖动还是向右拖动的。所以最后我们要 2 x 2 共四种情况。代码如下:
let up = e => {
    let x = e.clientX - startX;

    //index不变,向下取整,需要分情况,可读性好
    index = (index - (x - (x % 500)) / 500) % children.length;
    index = (index + children.length) % children.length;
    let base = x % 500;

    if (base > 0) {
        if (base > 250) {
            children[index].style.transition = '';
            children[index].style.transform = `translateX(${(-index + 1) * 500}px)`;
            let pre = index === 0 ? children.length - 1 : index - 1;
            children[pre].style.transition = '';
            children[pre].style.transform = `translateX(${-pre * 500}px)`;
            index = pre;
        } else {
            children[index].style.transition = '';
            children[index].style.transform = `translateX(${-index * 500}px)`;
            let pre = index === 0 ? children.length - 1 : index - 1;
            children[pre].style.transition = '';
            children[pre].style.transform = `translateX(${(-pre - 1) * 500}px)`;
        }
    }
    if (base < 0) {
        if (base < -250) {
            children[index].style.transition = '';
            children[index].style.transform = `translateX(${(-index - 1) * 500}px)`;
            let pre = index === 3 ? 0 : index + 1;
            children[pre].style.transition = '';
            children[pre].style.transform = `translateX(${-pre * 500}px)`;
            index = pre;
        } else {
            children[index].style.transition = '';
            children[index].style.transform = `translateX(${-index * 500}px)`;
            let pre = index === 3 ? 0 : index + 1;
            children[pre].style.transition = '';
            children[pre].style.transform = `translateX(${(-pre + 1) * 500}px)`;
        }
    }

    document.removeEventListener('mousemove', move);
    document.removeEventListener('mouseup', up);
};
上面的代码比较繁琐,其实我们可以将情况简化,我们可以利用 Math.round() 四舍五入求出 mouseup 触发以后要显示的图片(四舍五入后就不需要在特别判断哪个占的面积大了),现在我们要判断的就是另一张图片是前一张还是后一张即可。这个判断也是有规律的,我们利用 Math.abs() 和 Math.sign() 可以得出其值,Math.sign(base) 判断是向左还是向右拖动,Math.abs(base) 判断 base 是否超过一半,结合两者我们就能判断出是上一张还是下一张。代码如下:
let up = e => {
    let x = e.clientX - startX;

    //index 四舍五入,代码简洁,不易理解,主要是利用四舍五入,统一了要从可视范围移出的元素的下标
    index = (index - Math.round(x / 500)) % children.length;
    index = (index + children.length) % children.length; //四舍五入,得到的就是mouseup触发后应该显示的图片下标
    let base = x % 500;
    for (let offset of [0, (Math.abs(base) > 250 ? 1 : -1) * Math.sign(base)]) {
        let pos = (index + offset + children.length) % children.length; //获得另一个要移动的图片的下标(要移除可视范围的图片)
        children[pos].style.transition = '';
        children[pos].style.transform = `translateX(${(offset - pos) * 500}px)`; //一个下标为index图片要显示它的偏移量是 -index, 偏移量 -1 表示再向左移动一个图片单位,偏移量 1 表示向右移动一个图片单位,最后的总偏移量为 -index + offset
    }

    document.removeEventListener('mousemove', move);
    document.removeEventListener('mouseup', up);
};
这样代码也简单多了,不过要比上面那个难理解一点。理解的关键就是,同一个方向的移动,base 是否超过一半其 index 是不同的。
完整的代码查看:图片轮播效果
总结
轮播问题的主要逻辑就是我们不需要关注所有图片,不需要每次移动都要保持视口外的图片都在“正确”的位置,我们只需要关注几张与当前显示相关的图片即可。


